Monday, April 23, 2007

Red Wine Risotto with Peas

I can not even begin to explain how excited I was to see that someone had commented on one of my posts. I started writing online several months ago because I had fallen so in love with other blogs. Honestly I think one of my favorite aspects of having this website is the list that runs on the left hand side. No matter where I am, I can browse to my blog and then go down my list of favorites and see what everyone else has cooked up.

Anyway, I never really thought about other people coming across my blog and was ecstatic and slightly embarrassed that someone had. Tara, from Seven Spoons takes GORGEOUS photographs and I feel like such an amateur in comparison. I made her soup a few weeks back and linked to her website in order to give credit where it is due. She must have followed that link and discovered my post. Not only did she comment on the muffins that I made to accompany her soup, but she called them "lovely." Imagine that! Thank you Tara.

My point in all this is that her comment has pushed me to try harder and work on my photography skills. Too often I am starving once I've finished cooking and just want to dive right in. It's difficult to resist and instead play with lighting and angles until I get the perfect shot. However, I believe that good photographs are the one constant element among my favorite food blogs and I know that I won't ever be "proud" of my blog until I have better photographs to contribute.

On Friday Alex and I decided to make risotto. I made it once before with my father but it had been a long time since then and my role was quite simple, "stir." This time around I would be responsible for a whole lot more and I hoped to pass the stirring role to Alex.For the recipe, we decided on Giada’s red wine & pea risotto. We could not have picked a better recipe, it was perfect and exactly what we were craving. It is creamy and rich and the peas give it that extra oomph. I also loved the green parsley bits laced throughout. All together, it was simply exquisite. I can't wait to make it again.

It's one of those dishes I would gladly serve to company and have mentally planned out several meals for the next time that I get to play host. If you've never made risotto it really isn't as difficult as you likely believe it to be. The only problem with it is that it requires constant attention.......I promise that it's well worth it in the end.

Bon Appetit!

Red Wine Risotto with Peas

Giada De Laurentiis, Family Dinners

3 1/2 cups chicken broth
3 tablespoons unsalted butter
1 cup finely chopped onion
2 garlic cloves, minced
1 cup arborio rice
1/2 cup dry red wine
1/3 cup frozen peas, defrosted
1/4 cup chopped fresh flat-leaf parsley
1/2 cup freshly grated parmesan cheese, plus more for serving
salt and freshly ground black pepper

Bring the broth to a simmer over medium-high heat. Cover the broth and keep it warm over very low heat.

Melt the butter in a large, heavy saucepan over medium heat. Add the onion and saute until translucent, about 8 minutes. Stir in the garlic and saute for 30 seconds, until fragrant. Stir in the rice. Add the wine and stir until it is absorbed, about 1 minute. Add 3/4 cup of the hot broth; simmer over medium-low heat, stirring often, until liquid is absorbed, about 6 minutes. Repeat adding 3/4 cup of hot broth 2 more times, stirring often, about 12 minutes longer. (At this point, the risotto can be set aside for up to four hours. Refrigerate the risotto- the rice will still be firm - and remaining broth, uncovered, until cool, then cover and keep them refrigerated.) Bring the remaining broth back to a simmer, then cover and keep it warm over very low heat before proceeding.

Stir 3/4 cup of the hot broth into the partially cooked risotto over medium heat until the broth is absorbed and the risotto is hot, about 3 minutes. Add the remaining 1/2 cup of broth and simmer until the rice is just tender and the mixture is creamy, about 5 minutes longer. Stir in the peas and parsley. Mix in 1/2 cup of the Parmesan cheese. Season to taste with salt and pepper. Spoon the risotto into bowls. Sprinkle with additional cheese and serve.

(I topped mine with shredded pot roast)

Monday, April 16, 2007

Feta Cheese Muffins


So much for Spring. It has been gray and gloomy here the past week. Normally this is the time that my body starts craving healthy light foods like salads and fruits but since the temperature is more like winter then summer, my body still wants the warm and hearty.

Both Alex and I were slightly hung over this morning after a late night of celebration with friends. They recently got engaged so drinks were aplenty. While definitely worth today's headache it didn't make the kitchen quite as appealing to me. I decided soup would be the easiest option, allowing me to throw together the ingredients then lay on the sofa and wait. I came across Tara's recipe for Chirizo Lentil Soup and it sounded delicious so I went with that.

I wanted to serve something alongside the soup and initially planned on picking up a loaf of bread. However, as I was walking to the market I remembered that we had a fridge full of Feta cheese and I decided to do something with that instead.

Why does someone have mass amounts of feta? Well, Alex works for a food distribution company and lovingly brings home bulk quantities of the food we love. Currently our apartment is stocked with four, 1.5 lb bags of frozen shrimp, two wheels of Kefalograviera cheese, a tub of buffalo mozzeralla, two 3 liter bottles of Cretan Olive Oil, and three pounds of feta. I'm a lucky girl and have nothing to complain about there!

The idea for feta muffins came from an article I read in the Globe a couple weeks back. While I originally thought about adapting it, I just didn't have the energy. Regardless, the muffins were good and don't need any alterations. I'd make them again but feta is so good plain that unless you too have three lbs of it laying around, you may not want to mess with it.

Feta Muffins
1 cup flour
1 tablespoon baking powder
1 cup plain, low-fat yogurt
3 eggs
1/3 cup corn oil
1 cup crumbled feta cheese
1.) Set the oven to 400 degrees. Prepare a muffin tin with cooking spray / butter
2.) Combine the flour and the baking powder. Drain any liquid from the top of the yogurt.
3.) Mix the yogurt, eggs, and oil. Fold in the the flour mixture, then the feta. Don't over mix. Divide the batter among the muffin cups.
4.) Bake the muffins for 4-5 minutes. Lower the oven temperature to 350 degrees and continue baking for fifteen to twenty minutes longer, or until the muffins are golder brown. Serve warm!

Wednesday, March 28, 2007

My epiphany in hosting...

One of my father’s most alluring characteristics is his ability to entertain. All of my favorite memories exist with him as host. Whether it be dinner at one of his restaurants or a party at our own home, the best of times are always had when dad takes over. Actually that’s not quite right, oftentimes even when he is not “the host,” you can find him serving up drinks and checking in to ensure that everyone is having a good time.

To me, a good host is someone who knows what a guest wants without them having to ask. It’s the ability to make people feel comfortable and at ease. In addition to those things, a good host makes an effort to do something special. His or her guests see a unique touch or special addition that was made just for them. A good host prepares a meal that is suited to their guest’s tastes, they may make a beautiful dessert. If they've thought ahead, they use fancy plateware and cloth napkins.

Recently, Alex and I were invited over to a friend's for dinner. The couple are newlyweds and therefore swimming in household items from their wedding registry. It was the first time I'd been to their home and I was quite excited to see how it looked. Alex had helped them build furniture and we were both anxious for a tour. When we arrived, I immediatly knew they put effort and time into planning and preparing our evening. Their dining room table was set beautifully with precisly matched plateware and utensils. Candles were lit, and they had pre-prepared all the food so they were able to spend time with us, not just in the kitchen. It was the first time I'd experienced such thoughtfulness and it was truly wonderful.

Normally when Alex and I have people over, my major goal is to prepare a meal that everyone will enjoy. I believe that that's the marking of a sucessful dinner parties. However, afer our evening with friends, I now realize that there are other gestures that create lasting memories and can show, just as well as food, that you care.

Last weekend Alex invited several couples over for dinner. I was excited to have something to work on and plan as work has been pretty slow the past few weeks. However, as things unfolded it seemed only one couple would be able to attend. While I didn't have much to coordinate it turned out to be a good thing as I realized we only have four matching plate sets.

Alex requested chinese food and I thought it would be fun for us to make summer rolls. I assumed that they would be difficult but actually were simple. We bought pre-cut carrots and cabbage so there was hardly any work at all. Rolling the ingredients was my favorite part of preperation, and the reason I'll likely make them again. It was great to have an activity that kept Alex in the kitchen with me, and the healthy results were an added bonus.

The meal started with spicy shrimp and chilli-garlic sauce. For dinner I made chicken lo-mein to serve with the spring rolls. Dessert was rum cake and carrot cake, courtesy of our guests. All in all it was a wonderful evening and we can't wait to host again.

Wednesday, March 21, 2007

Seriously Delicious Pasta

We experienced our first winter storm the day before Saint Patrick's day. It wasn't a horrible blizzard but it was cold and windy and we'd gotten used to leaving our scarfs, gloves and boots in the closet. Needless to say we weren't eager to walk around Boston, pushing our way through the crowds in an attempt to get to the bar.

Instead, we thought about going out to dinner, feeling a bit pathetic that at 21 and 22 years old we'd celebrate with blockbuster and takeout. Eventually though, we decided that the later was exactly what we wanted to do. So, after picking up
The Holiday (I enjoyed it even if the reviews are poor) and The Departed (One of the Top Five Best Movies I've ever seen) at Blockbuster, we started discussing Chinese, Thai, and Indian food. Thankfully, I remembered all the spectacular ingredients I had sitting in our fridge and we instead enjoyed a truly hearty and comforting pasta dish.

Initially I was planning on making a sausage and spinach soup so I had purchased beautiful Italian sausages from wholefoods and a gigantic bag of spinach. I also had creme fraiche left over from the
spinach pancakes and some basil and Romano cheese. The end result was honestly one of the best pasta dishes I've ever made (and I make a lot) and as Alex was a fan as well, I know I'll be making it again. I think the biggest success / contributor to this dish is the creme / lemon sauce creation, so if you have different meat or vegetables handy I'm sure they'd taste just as good.

Saint Patrick's Day Pasta

Sauce:
1/4 cup creme fraiche
2 tbsp. lemon juice
1/4 cup basil
2 tbsp. chicken broth
salt & pepper

Sausage-Spinach-Sun Dried Tomatoes- Pasta:
2 large Italian sausages (could use spicy / sweet - i used regular)
1 large bag of spinach
4 tbsp. garlic, diced
1/4 cup sun dried tomatoes soaked in olive oil- diced
1 box dried wheat pasta (I used spirals)
3 tbsp extra virgin olive oil
Romano cheese for sprinkling

Preperation:
1.) SAUCE: Place all sauce ingredients into the food processor and blend until creamy, adding more chicken broth if consistency is too thick.
2.) PASTA:

Prepare pasta following box directions.
Slice sausage into bite size pieces (remove casing)
Heat oil in pan and add garlic once hot
After sauteing garlic for 3-4 minutes add sausage and sun dried tomatoes
Once sausage is cooked through add 1/2 a bag of spinach
Cook for five minutes
Drain pasta and add it to the sausage / tomatoes & spinach
Pour food processor sauce over the ingredients
Serve Immediately with cheese and fresh basil

Enjoy!!

Thursday, March 8, 2007

Sloppy Joes

The name too often brings to mind hair nets and old women but I swear that anyone willing to give it another try will change their tune. Sloppy Joe's are delicious. They are my favorite sandwich by far and I'm convinced that if you brush aside your doubt and fire up the skillet you'll find that you like them too. Just make sure you have lots of napkins on hand, the sloppy part is no joke.

Sloppy Joe's:

1 1/2 lbs 85% lean ground beef
1 Yellow Onion, chopped
1 red bell pepper, seeded and chopped
sea salt and ground black pepper, to taste
1 1/2 cups tomato ketchup
3 tbsp apple cider vinegar
1 tbsp Worcestershire sauce
2-3 tbsp brown sugar
3 tbsp prepared yellow mustard
4 burger buns, toasted

Brown the beef in a nonstick skillet over medium heat, 5-7 minutes. Add onions and bell pepper and season with salt and pepper. Cook until vegetables soften, about 7 minutes. Add ketchup, vinegar, Worcestershire sauce, sugar and mustard. Stir to combine. Simmer until slightly thickened, about 10 minutes. Spoon over split hamburger buns.

Tuesday, March 6, 2007

Grilled Corn, Onion & Herb Pizza

My beloved Cooking Light features several pizza recipes. Every one that I’ve tried has been delicious and so when I came across a package of Trader Joe’s herbed pizza dough in my freezer I knew just where to turn.

The recipe that I chose turned out delicious. It’s really light and a wonderful reminder of summer in this dreary weather. The scattering of scallions and lime zest after the pizza bakes is a must. It really helps to extenuate the smokey taste of the mozzarella and the sweet onions. Also, you can’t go wrong with grilled corn.


Corn and Smoked Mozzarella Pizza

2 ears shucked corn
2 Tablespoons olive oil
1/4 teaspoons crushed red pepper
1 garlic clove, minced
1 cup (4 ounces) shredded smoked mozzarella cheese
1 cup very thinly sliced red onion
2 tablespoons chopped chives
1 1/2 teaspoons grated lime rind
package of prepared pizza dough (I used Trader Joe's Herbed Pizza Dough)
(Makes 2, 9 inch pizzas)

1. Prepared grill or broiler
2. Place corn on grill rack or broiler pan coated with cooking spray; cook ten minutes, turning occasionally. Cool. Cut kernals from corn to measure 1 cup; set aside.
3. Place 1 tablespoon oil and red pepper in a small bowl; microwave on HIGH 30 seconds. Stir in garlic; set aside.
4. Preheat oven to 500 degrees
5. Roll out prepared pizza dough into a 9-inch circle on a lightly floured surface. Working with one portion at a time, place dough on a pizza pan or baking sheet coated with cooking spray and sprinkled with 1 tablespoon cornmeal. Crimp edges of dough with fingers to form a rim.
6. Brush dough with oil mixture; sprinkle with cheese. Top with 1/2 cup cheese. Top with 1/2 cup corn and 1/2 cup onion. Sprinkle with 1/4 teaspoon of salt. Bake at 500 degrees for 8 minutes or until golden. Sprinkle pizza with 1 tablespoon chives and 3/4 teaspoon lime rind. Cut into wedges. Enjoy!

Monday, March 5, 2007

Fork need not apply- Savory Pancakes


Thursday was unusually warm for New England March and I returned home from work, in a noticeably better mood then usual (it’s amazing what a little sunshine can do for you.) Alex suggested that Friday evening we go to his friend’s for a barbeque and that sounded just about perfect to me. What a wonderful way to usher in what must be early spring.

Before I get too far into this story I have to explain barbeque as there seems to be some confusion over the word. I grew up believing whole heartedly that the term barbeque referred to anything marinated in barbeque sauce prior to grilling. To me, the best kind of barbeque was always chicken drumsticks. However I’ve since learned that many people use the term to describe grilling and far too often (at least in my opinion) it refers to steaks and other beefs. My beloved spicy tart sauce is no where to be found. Alex is one of those people who describe grilling outside as barbequing and I therefore knew to assume that this cook out would result in a pile of steaks. While this realization was quite a let down the first few times when I anticipated messy chicken, it’s now helpful because I know what expect. I also know what to bring that will pair well with steak and that I definitely do need to bring a dish if I want a full meal. (Like I said before I don’t enjoy steak all that much, if at all.)

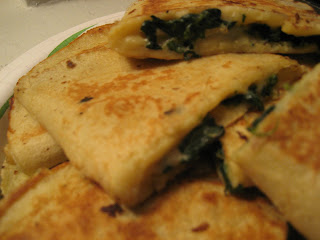
Being that I spent Saturday of last weekend browsing through cookbooks, I had plenty of recipes in mind that would work for such an occasion but one stuck out, Spinach Pancakes. This hand held appetizer could be served before or during the meal depending on what else they had, and I assumed it was something everyone would like. It’s not spicy, it’s relatively plain, and it’s identifiable. I could explain and compare it to scallion pancakes and I was relatively certain they’d be gobbled up with a comparison like that. (While these are characteristics I usually ignore, I’ve learned that they are important if I want other people to eat what I bring.) So, I set off to Whole Foods to buy the ingredients and decided I’d throw it together right before we left so they’d still be warm.

Friday morning I awoke to a screaming alarm clock and room so dark I swore it couldn’t be six. Rain pelted the windows and I wanted nothing more then to stay in bed and forget all about my promise to go to the gym. That’s exactly what I did, but when I woke up at a leisurely 8:00, I thought of our dear outdoor barbeque and wondered if we’d be going after all.

The rain stopped at 3:00 and the barbeque survived. The host even stuck to his promise of grilling outdoors although with a little less excitement, as it was freezing. However, everything was delicious and these pancakes were a hit.

Next time I’d make them thinner and use less filling. These were more like quesadillas which are good but I think they’d be tastier if they were lighter. Alex liked them as is so it’s just a preference thing.
Whether you go thin or filling, make sure to try this recipe out. It’s versatile and would be good with other fillings as well. I was thinking of trying olive, tomato, and feta next time…..
Pancakes with Spinach and Cheese:
4 eggs - salt
2 cups all-purpose flour
3/4 cup milk
3/4 cup carbonated mineral water
10 ounces leaf spinach (frozen)
1 onion - 1 garlic clove
4 ounces hard cheese
2 tablespoons butter
1/4 cup creme fraiche
freshly ground pepper
freshly ground nutmeg
butter for the pan
Preparation:
1. For the pancakes, put the eggs, a pinch of salt, the flour, milk and mineral water into a small bowl and mix into a smooth batter with a hand mixer. Cover and let stand for about 20 minutes.
2. Meanwhile allow the spinach to defrost. Peel the onion and garlic and dice finely. Grate the cheese finely. Melt the butter in a pan and cook the diced onion and garlic until translucent. Add the spinach and fry briefly.
3. Stir in the cheese and creme fraiche, then season the spinach-cheese mixture to taste with salt, pepper and nutmeg.
4. Melt a little butter in a non-stick pan. Fill in a little of the batter, spread over the pan and make a pancake. Make 8 pancakes this way. Spread a little spinach-cheese mix on each pancake, fold the pancakes together, press the sides together firmly and cut into pieces.

Friday, March 2, 2007

So Simple Chicken Wings

Alex battles acid-reflux and has been told to stay away from spicy foods. Still, every time we go out to a casual restaurant I can count on him ordering Buffalo wings. He loves them and swears he could “eat them every day.” I wish I had thought to take a picture of the bones once he’s through because it’s miraculous how clean they are. I’ve never seen anyone eat wings like he does. He’s actually had a waitress point out his talent proclaiming she’s never seen anyone “eat ALL the chicken wing.” I can always count on having an empty plate if we share them as an appetizer because he steals my bones when I’m through and gnaws them clean.

I’ve tried to make him Buffalo wings before, but with no success. It was one of those things I’d given up on, believing they’d have to remain his restaurant indulgence. With this recipe that’s no longer necessary. Honestly, these wings are just as good if not better then those at restaurants. Also, they were SO simple to make that it’s just as easy to whip them up at home and serve double the amount for the same cost.

I feel a bit ridiculous posting this because there are so few ingredients but I will. I’m sure there are others out there who’ve tried and given up on wings but I have faith that this will bring you back around.


Chicken Wings:
2 1/2 pounds chicken wings, split and tips discarded
1/2 cup Franks RedHot Cayenne Pepper Sauce (or more to taste)
1/3 cup butter, melted

1. BAKE: wings for 45 minutes at 425 degrees until fully cooked and crispy, turning halfway.
2. TOSS: wings in Frank's RedHot Sauce and butter to coat completely and serve.

Thursday, March 1, 2007

Better make more next time.....

I came across this recipe for cabbage in The Boston Globe Magazine. I happen to love cabbage and when I read the ingredient list it sounded too good to pass up. In fact I made it that very same night and had a heaping plateful for my dinner. There were no leftovers and I think for cabbage that says enough:

Red Cabbage with Caraway and Green Apples:
1 tablespoon caraway seeds
2 tablespoons canola oil
2 shallots, finely chopped
1 clove garlic, finely chopped
1 medium red cabbage, quartered, cored, and thinly sliced
14 cup chicken stock or water
2 Granny Smith apples, peeled, quartered, and thinly sliced 2 tablespoons balsamic vinegar
2 tablespoons sugar
pinch of crushed red pepper
salt and pepper to taste

In a large skillet over medium heat, toast the caraway seeds, shaking the pan constantly, for 2 to 3 minutes or until they turn fragrant. Set them aside.In the same skillet, heat the oil. Add the shallots and cook over medium heat for 3 minutes, stirring often, or until they soften. Add the garlic and cook, stirring, for 30 seconds more. Stir in the cabbage. Cook over medium heat, stirring often, for 5 minutes. Add the caraway seeds, stock or water, apples, vinegar, sugar, red pepper, salt, and black pepper. Stir Well. Cover the pan and cook the cabbage over medium-low heat, stirring occasionally, for 45 minutes, or until the cabbage softens. During the last 15 minutes, remove the lid and let the liquid bubble until it nearly evaporates. Taste for seasoning and ad more salt or red pepper if you like.

Wednesday, February 28, 2007

Following the leaders, chocolate chip scones

I read food blogs A LOT. In fact, I pencil in an hour every weekday to check all my favorites for updates and to scroll through new finds that I inevitably come across. Through browsing I saw that Scones were pretty popular amongst bloggers. I don’t necessarily love scones and I’d usually pick a muffin or bagel over one if given the choice, but I thought that I had to make them at least once and what better time then now when I had such an array of recipes and suggestions at my fingertips. Originally I planned on making the apricot scones that I saw on "Pinch My Salt." However, when I was cutting up the dried fruit, Alex came over and made a horrible face. Apparently he does not like apricots one bit. Rather then having a pile of scones sit in the apartment that only I would eat, I decided to forgo the apricots and make chocolate chip scones instead. Alex has no qualms with chocolate or these scones.

I found Nicoles recipe to be perfeclty easy and delicious. I just substituted the apricots for chocolate chips, I'm sure any filling would be delicious!!

Saturday, February 24, 2007

Copy Cat, Baked Eggplant

Alex’s mom is a great cook. She makes the best sauces and salads I’ve tasted. I’ve always been scared to try my hand at her dishes because I know that my attempts will never match hers. I’m also afraid that because Alex has developed such a standard for these foods, it’ll be hard to meet his expectations.

There are three things she makes that after having, I simply cannot live without. They are: fatoush, tabouli, and baked eggplant. Fatoush is a delicious salad of tomatoes, onions, cucumbers and mint, topped with baked pita bread Tabouli is a chopped herb salad composed of parsley, bulgur, tomatoes, garlic, olive oil, and lemon juice. She serves it wrapped in lettuce leafs and it is addictive and refreshing. As for the baked eggplant, I do not know what ingredients she uses. But, I do know that I could happily eat the whole pan if no one was watching.

I came across deliciously ripe eggplant and decided to try and recreate her recipe. I knew I would need garlic, tomatoes, onions, parsley, and a substantial amount of time to let it bake.

The result of my attempt was not the dish I love but nonetheless delicious. After this initial test I now know to use vinegar and less red pepper flakes next time. I also think I’ll slice the eggplant in thin strips rather then cube like triangles. Finally, I plan on adding the onions later so that they keep their taste and crispness.

Baked Eggplant

2 eggplants
15-20 pearl onions
½ cup Italian parsley, divided
5 cloves of garlic, diced
2 tbsp. tomato paste (I used sun dried)
1 large can of crushed tomatoes (I used tomato-basil but I think anything would work.)
1 cup water
2 tbsp crushed red pepper flakes
1 tbsp ground coriander
1 tbsp ground cumin
Salt and pepper to taste

Rice to serve ( I like Bastami or Jasmine )

Prepare onions: slice in half and sauté in olive oil until browned. Remove from pan.
Drizzle more olive oil in pan, add garlic and sauté for three minutes.
Add eggplant to garlic and drizzle with olive oil, coating all slices.
Cover eggplant and cook for 5 minutes, toss twice.
Add tomato paste to eggplant and distribute evenly.
Place Eggplant mixture and onions in baking pan.
Pour crushed tomatoes over eggplant and onions, add water and ½ the parsley.
Stir in spices then cover in aluminum and bake at 375 degrees for two hours.
Uncover and place under broiler for five minutes until browned on top. Serve on top of rice and sprinkle with remaining parsley.

Thursday, February 22, 2007

Fridge Full of Fruit

(All this for a mere $50.00 plus they even threw in a Kitty, what a treat Thank You Russo's)

Whenever I need a little pick me up, I always know just what to do…. shop! As for what kind of shopping, I don’t discriminate and enjoy all different types of spending. However, my absolute favorite kind of shopping involves home good stores and purchasing small hand held gizmos / serving plates that I don’t need, but simply can’t pass up. (I may not eat sushi or have ever cooked a food that requires individual sauce, dipping bowls, but look at these, there a must!)

Recently I discovered, dare I say it, an even better store to shop in then my beloved Crate and Barrel. (Shocking I know) The store I found is a kind of co-op grocery market, and it is called Russo’s. If you live in Massachusetts you simply must check it out. I don’t know where or how to begin my explanation of this hidden gem so I’ll explain exactly what it’s like when the gates open and (angels and doves fluttering by) you enter.

Located in Watertown, the building resembles a barn or garden nursery from the outside. Once you enter you see how truly expansive it actually is and are immediately blown away by the quality and range of goods offered. The first things that you come across are floral arrangements lined up to the right of the entrance. They carry every kind of flower imaginable and with a fairly inexpensive price tag. (Last time I went they were selling ½ dozen roses for $4.99 and we bought a mixed bouquet for $9.99) You can mix and match the flowers, then bring them inside to be wrapped in tissue paper and ribbon. You may also order custom arrangements ahead of time.

After the flowers you enter the apple section. There you will find every variety of apple sold in wicker baskets for $1.99 a pound. So far, I’ve tried their granny smiths and their red gala and I’ve been pleased with both. After the apples is an equally impressive onion section with red, yellow, white, sweet, mini vidalia, pearl onions, shallots, garlic…. Etc. (Basically every kind of onion you could possibly want.) Beyond there, (before you have even entered the actual store) you will find cabbage, brussel sprouts and potatoes of every variety.

At this point in the shopping excursion, you’ll likely have a cart full of goodies but before you start planning recipes in your brain..... open the double doors and check out what all the fuss is about….

To the left you’ll find nuts, dates, trail mix, greens like you wouldn’t believe, imported cheeses, steaks, tenderloins, yogurts, herbs, eggplant, zucchinis, squashes… I could go on, and on, and on but I realize I can’t possibly capture every item that they carry. Just trust me when I say they have everything you are looking for and then some.

In the right and center sections of the store they carry oranges, berries, tomatoes, nuts, peppers (again, of every variety) and mushrooms. Beneath the vegetables you’ll find imported pastas, italian cookies, brushetta toppings, crackers, homemade bread crumbs, dried fruits, and chocolate spread. Honestly I’m always too overwhelmed by the delicious vegetables and fruits to actually bend down and browse these items but have vowed that next time I will. We did purchase imported spinach pasta from Italy and it was far better then Barilla. I know that it’ll be like rediscovering the store once I truly dig through the other items on their bottom shelf.

Their deli carries boar head meat, imported salamis, homemade pasta salads, fresh pasta (last time we were there they had lemon basil, spinach, herbed, wheat, and plain fettuccini) and bologna, ham, turkey, and pepperoni of every kind. The cheese section won’t let you down and you’ll likely walk out with more then your family can possibly consume. We got some fresh mozzarella and goat cheese feta and Alex said the Feta “tasted like Greece.” Quite the compliment.

In the back of the store you’ll find the prepared foods, the bakery and baked goods, and the floral department. I’ve never tried anything from their prepared section but it makes my mouth water just thinking about it. The lasagna slices look like they weigh a good ten pounds each, and the chicken parm and meatballs are soaking in perfectly thick Italian gravy.

I love to browse through the baked goods and tease myself but I’ve never, and probably never will, allow myself to test these out. We did try their almond cookies which were quite good, (although then we had them in the Northend and realized they were incomparable) and their cinnamon almond biscotti which are the perfect companion with my nightly mug of tea.

The floral section is impressive and they sell potted plants and seeds for your garden. I’d probably have more to say about it if I had a garden, but I don’t so you’ll have to check it out for yourself.

There are so many reasons to love this store. I love it for the fruits and vegetables which are comparable to Whole foods but a fraction of the cost. Aside from that, their selection is four times as large and I assure you, you’ll come across a handful of items you’ve never seen or heard of before. It inspires me to try new and healthy things and for $50.00 stocks my fridge with enough to last at least two weeks. (For us this is quite the feat since at Shaws / Stop & Shop we spend nearly $120)

It’s a great place to go before hosting a dinner party. You can get everything you need in one place and even purchase the centerpiece. I love it, and if you go, you will too.

(An impromptu stir-fry inspired by a trip to Russo's)

Wednesday, February 21, 2007

Margarita Pasta

It was dinnertime and I hadn’t any idea what we were going to eat. I know, this a dilemma many people face on a daily basis. However, for me, it’s not something I’m accustomed to. Usually I devote my Sunday mornings to writing out our weekly grocery list including what we’ll eat for dinner each night. For whatever reason a day escaped without preparation and the 6:30 bell rang with growling stomachs.

Our fridge was not empty, so luckily this is not a nightmare tale of greasy food we were forced to order in. We had plenty of ingredients on hand and it was just a matter of whipping something together quickly. We had a bunch of basil from Russo’s and some fresh mozzarella. I crossed my fingers that I hadn’t eaten all the cherry tomatoes and was ecstatic when I finally found them hiding behind the cranberry juice.

I was in the mood for something hearty so a simple salad would not suffice. I decided instead on pasta. The impromptu recipe that follows is delightful and the balsamic dressing finishes it off perfectly. While it was such a simple and easy dish it is still pretty enough to serve when company comes.

Margarita Pasta
1 ½ cup cherry tomatoes
1 cup chopped fresh basil, divided
¼ cup fresh mozzarella, cubed
½ cup balsamic viniger
2 tbsp. tomato pasta ( I used sun-dried )
¼ cup oil
1 tbsp. crushed red pepper flakes
Linguini / pasta of your choice
Salt and pepper to taste


1.) Prepare Pasta according to box directions.
2.) Slice cherry tomatoes in half, place on baking sheet, drizzle with oil and sprinkle on salt. Roast for at least twenty minutes.
3.) Place Roasted cherry tomatoes and their juices in sauté pain, add ½ the basil, the tomato paste, the balsamic, the red pepper and the oil. Saute over low heat for 10 minutes or until the sauce thickens and reduces.
4.) Add pasta to sauté pan, turn off heat.
5.) Toss in the mozzarella and remaining basil.
6.) Add Salt and Pepper to taste
7.) Enjoy!

Thursday, February 15, 2007

It comes highly recommended


I love meals that come together quickly and without much effort. I also love food that you can prepare beforehand and finish in one dish with a quick bake in the oven. That said, I prefer that my food have layers. You know, sweet and savory… fresh herbs piled on top of a spicy meat with sweet vegetables.

I am a fan of slow cooked food and, I hate to admit it, the crock-pot. It’s one of those kitchen tools that you hide away and take out in the blistering cold of winter when nothing but a thick beef stew will suffice. It’s a tool that does all those things I love. It allows you to prepare the ingredients before hand and it takes your taste buds on a winding tour of the slow cooking process-- through the herbs, the vegetables and the sauce. The final product always begs for something fresh and crisp on top and comes together so easily that all you have to do is plate it, or make a side of mashed potatoes / rice to soak up all that saucy goodness.

A crock-pot was one of my first purchases when I got an apartment. My mom, while not the cook of our household, often used one. I used to love returning home from school to the aroma of slow cooked meats and veggies and found her dishes to be the most comforting. Believing that Alex would embrace the dishes with my same delight, I decided to “treat” him one day to slow cooked BBQ ribs. Well, it turns out not everyone likes the aroma of the crock pot. He complained about the scent of onion for at least two weeks straight. Granted, our clothes (even those that were hung in the closet of our bedroom) did reek. It was a fair enough complaint. However- I hoped that it was just that one dish that would produce those stinky results.

After the scent had FINALLY disappeared I warily took out the crock-pot and attempted to make the filling for a chicken pot pie. After work, before I even opened the apartment door, I could smell it lingering on our floor mat….. the same smell that the ribs had produced……the dreaded crock pot smell. I threw open the windows and sat shivering trying to waft it out the door and praying it would go away before Alex got home. Didn’t happen, and I haven’t used the crock pot since. I guess our apartment is just too small. We’re lacking ventilation so the crock-pot is out.

Anyway, the point of this rambling is to introduce a dish I discovered on fellow blogger Brilynn’s site. The recipe, “Spicy Black Bean- Sweet Potato Burrito” was so good, and so multi-dimensional that I am inspired to experiment with as many new spices, peppers, and random vegetable combinations that I can come up with. The smooth and mushy texture of the mashed sweet potatoes, the black beans and chili spiced onions, the crispy whole wheat burrito, the cold sour cream and the spicy salsa—mmm….mmm…. and more mmm!! Thank you Brilynn.

The dish reminds me of all those slow cooked recipes my mom used to make. I think the flavor combination is perfect and if you are looking for a layered dish that produces different tastes with each bite- this is it.

Wednesday, February 14, 2007

Chocolate Chip Hazelnut Cookies

My valentine packages have been mailed. While I’m not entirely satisfied with the way they turned out, I’m sure they’ll be gobbled up anyhow. The dishes I decided on were chocolate chip hazelnut cookies, Jamaican banana bread, and spicy mixed nuts.

Anytime I try to cook for someone other then Alex the results are always sub par. I feel like I am doomed in that sense. Take last night for example; I decided to make spicy black bean- sweet potato burritos from the Definitely Not Martha blog sight. (This is a new blog I just discovered and am completely enthralled by. The writing is brilliant and entertaining and her recipes all sound do-able and delicious.) Anyhow, the dish DID turn out delicious and I would have been proud to serve it to just about anyone. Yet the day before when one of Alex’s friends came to dinner I made a Mediterranean vegetable pizza with whole wheat dough and of course, it burnt. The same thing happens whenever my parents come. I can be on a roll with wonderful dinners but somehow the night they arrive, after so much careful prep and planning, the dinner is just…. Eh…… edible. Well anyhow this is the way I feel about my valentine packages. Just “eh.” Maybe it’s all those high hopes.

Hazelnut cookies are one thing I do recommend. I’ve made them before and every time I do, they receive rave reviews. The recipe I use is from Giada’s Family Style Dinners Cookbook, and everything about it is divine. While I must say that these are not “pretty” cookies, they are tasty, and the aroma and texture of the roasted hazelnuts blends perfectly with oozing bittersweet chocolate. If you want something to serve alongside tea or coffee, this is it.

Chocolate Chip Hazelnut Cookies:


1/2 cup old-fashioned oats (not instant)
2 1/2 cups all purpose flour
1 tsp. baking powder
1 tsp. baking soda
1/2 tsp. salt
1 cup unsalted butter (softened)
1 cup light brown sugar
1 cup granulated sugar
2 large eggs
1 tsp. vanilla extract (Trader Joe's bourbon blend is delicious)
1 cup hazelnuts (slow roasted, husked, & chopped)
1 (12 ounce) bag semisweet chocolate chips

1.) Preheat oven to 325F.
2.) Finely chop oats in food processor. Transfer the oats to a medium bowl.
Mix in the flour, baking powder, baking soda, and salt. Set aside.
3.) Using an electric mixer, beat butter and sugars in a large bowl until fluffy.
Beat in the eggs and vanilla.
Add the flour mixture and stir until just blended.
Add hazelnuts, and chocolate chips.
4.) Drop the dough onto prepared baking sheers by rounded tablespoonful, spacing them 1 inch apart.
(Don't flatten the dough.)
Bake until the cookies are golden, for fifteen minutes.
5.) Cool the cookies on a baking sheet for five minutes
transfer them to a cooling rack and cool completely.

Since I was so unsatisfied with the others, I’m not going to include those recipes. However, I have to say that the idea behind the banana bread is a good one. Rum, coconut, and lime are three ingredients that belong together. Therefore, the reason this dish turned out bad isn’t the “Jamaican” component. It’s the “banana bread.” The base just was not good. The texture was really rubbery and lacking sweetness.

If I made it again, (and I plan to) I’d use the recipe that I wrote up before and give it a Caribbean twist.

Thursday, February 8, 2007

Inspired by Dad: Split Pea Soup


What is more comforting in the bitter cold that is New England’s winter- then split pea soup? This soup is one of my most nostalgic, as growing up it was my father’s favorite. I can vividly remember winter nights with the fireplace turned high, (and at this point we still had an authentic wood burning fireplace) blankets curled around me, the cartoon network dancing across the television screen, and the scent of thick pea and ham soup simmering away in the pressure cooker.

While I had never made this soup before it seemed pretty straight forward and simple, although I did worry about the success of it without a pressure cooker. After browsing through several cookbooks and some websites I saw that the pot was unnecessary. Thank heaven for small miracles because I don’t have room for another pan in the kitchen and would have been tempted to buy one to suffice my craving.

Dad always made pea soup with a thick and somewhat fatty slab of ham on the bone. Some of the recipes I looked at called for the same thing while others left meat out altogether. I was looking for a similar flavor to that of my dads so I set off to the grocery store in search of a hunka pig (sorry, I couldn’t resist.)

After an unsuccessful search I learned that Shaws “does not carry” ham on the bone. I also found out that I must not be the only one craving pea soup. Wholefoods “just sold out,” but they did have slabs of boneless ham which were “just as good.” At this point I was set on digging into a bowl of the creamy concoction. I could no longer feel my toes from the trek around Boston, and decided that the boneless would have to do.

Luckily, boneless or not, the soup turned out exactly as I had hoped. It was nice and thick and the chunks of carrot and ham were just the right size. It was also a cinch to prepare and required only one pot. Also, I didn’t have to go through the mess of cutting the ham OFF the bone after cooking. (Although next time I will still seek out the boned version as I’m sure it’ll bring the flavor off the charts)

This is one of those recipes that I have to love. It’s quick, it’s easy, and it’s exquisitely gratifying.

Couldn’t be better- split pea and ham soup:

1 small vidallia onion chopped
¾ cup chopped carrots
¾ cup chopped celery
2 cloves of garlic, chopped
3 bay leaves
2 cups dried split peas
1 ½ quarts chicken stock
2 cups water
2 tbsp. dried thyme
1 cube chicken bullion
2 cups cubed boneless ham (I used applewood smoked.)
Pepper & Salt

In a large Dutch oven sauté first five ingredients until onions are translucent (about seven minutes.) Stir in the dried peas then add the remaining ingredients. Bring to a boil over high heat then cover and reduce heat to low, simmering for 1 ½ - 2 hours. (Try to avoid the temptation to peak as it’ll let out all the heat and the soup may stick.) After the soup has reached a thick consistency and the peas are no longer in “pea” form, turn off the burner and let it sit for 10-15 minutes before serving.

(I don’t know why this final step is important but I do it every time I make soup to let the flavors intermingle and to encourage the broth to thicken even more.)

The Man of my Kitchen


I was treated like a queen last weekend. After our visit to Russo’s (which I still have every intention of writing about but need to set aside enough time to sufficiently give it justice) Alex not only offered but insisted on making dinner with no assistance “from the peanut gallery”!!!!

He had been raving about a stir fried spinach and garlic that he made for his sister and I wanted to try it. This suggestion seemed to suffice his desire for menu direction and the sirloin at Russo’s gave him another push. He decided on scallops, steak, and spinach- a bit of a twist on the traditional surf and turf but one that I happily embrace. I’ve written before about my “take it or leave it” attitude towards lobster.

I don’t love steak; in fact I hardly even like it unless slathered in a gorgonzola or blue cheese sauce. If I do eat steak it’s usually when I’m visiting my parents and it’s ALWAYS done on a charcoal grill.

Since we have an apartment in Boston there is no option of charcoal grilling, in fact I believe it’s illegal. Therefore, I never make red meats since I know I can’t make them “the right way.” Without a grill, what’s a steak?

Alex isn’t quite so pessimistic and as it turns out he has every reason not to be. The sirloin he prepared exceeded any sort of expectation I may have had. It was juicy and peppery and the Montreal seasoning made it taste like home. Surprisingly it was not the broiler he used but a frying pan. I would never have chosen that route when faced with a challenging ingredient such as sirloin. However, his decision was right and his steak was perfect.

Ginger-Lime-Soy Sauce; the scallop marinade may sound questionable, but I assure you- all the flavors work beautifully. I think he is more of a foodie then he admits to me. I don’t know where he came up with the idea but what I do know is that we’ll be making it again and I suggest you give it a go as well:

Ginger, Lime & Soy Scallops:

1/3 cup lime juice
Zest from 2 limes
¼ cup soy sauce
1 tsp. garlic powder
2 tbsp. freshly grated ginger
Pepper & salt
8 jumbo / 12 regular sized scallops

1.) Place scallops in Zip-log bag
2.) Mix remaining ingredients
3.) Pour marinade over scallops and distribute evenly
4.) Refrigerate for at least one hour
5.) Saute scallops with marinade until browned on both sides.
6.) Serve (to your giddy girlfriend who sits waiting with her feet propped happily on the coffee table!)


After this triumphant royal therapy I have begun to question my role in the kitchen as well as my boyfriend’s true calling. Is it possible that he is a foodie like me? Maybe he flips through cookbooks and is enthralled by food blogs. Maybe when I’m away he browses through magazine clippings, mixing the ingredients and interpreting the suggestions. I don’t know how else to explain his expertise in the kitchen as I know he did not cook much growing up. (Why would he when his mother makes the meanest sauce dishes I’ve ever had?) I also know he doesn’t cook much now since I have our menu’s planned six months in advance. (But all that’s about to change.)

I guess it doesn’t matter how he learned. Either way, I am grateful of his talent and proud to have him be the man in my kitchen. I eagerly await his next urge to queen-ify me!

Tuesday, February 6, 2007

Candies? Cookies? Breads? Nuts?.....

I've changed my mind at least twenty times concerning what I should send out in my Valentine Day packages. Initially I was intrigued by a Martha Stewart column in the globe that offered advice on creating your own heart shaped candy boxes. While I've never actually made candy before it did seem an appropriate and thoughtful gift. Plus, I've been meaning to experiment with different cooking methods (although I was leaning more towards homemade pasta / bread, not candy). Therefore, for a couple of days, I was set on shipping out boxes of chocolates for my valentines.

In order to get the necessary homemade-box supplies as well as the cupcake like inserts for the candies, I needed a craft store. You would think that this would be an easy task living in a city like Boston. Not so. The closest large-chain craft stores are in Natick, about forty minutes away. I suppose I could have found the necessary supplies at other stores (Papyrus, Crate and Barrel, or Williams and Sonoma) but I was trying to spend as little as possible and also looking for a large selection. Anyway, I didn't get to the craft store over the weekend. Instead we went to Russo's, a hidden gem wholesale vegetable and produce store, located in Watertown. I could go on, and on, and on.... and on about how amazing this store is (this really says a lot seeing as I'm from Rochester and the birthplace of Wegmans) but I will save that for a different day. I know that once I start, they'll be no stopping me.

After Russo's, our fridge was stocked with all sorts of fresh produce and vegetables. (All for a mere thirty dollars, but more on that later.) I had purchased bananas at Wholefoods a few days earlier and knew they'd rot before Alex or I ate them. Bananas just aren't that appealing when you have juicy, fresh cut pineapple- plump, sour grapes- and steroid size strawberries staring back at you. Knowing I had bananas on hand that needed tending to, I decided to give banana bread another go. (I'd made an attempt at banana bread on our old un-working stove and wound up with a burnt black top and oozing raw egg center. This time around, my expectations were rather low and if I was unsuccessful it's likely I'd have been turned off forever.)

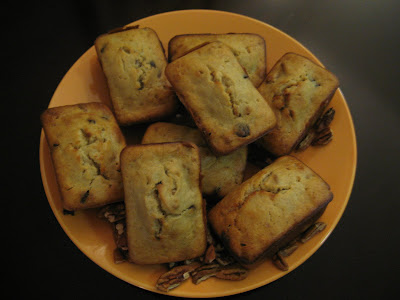
To make the bread a little more unique I decided to bake it in mini-loaf tins. I figured it was more likely to be eaten this way since we could just throw it in our backpacks on the way to class. I was right! We've already eaten half the batch and I don't feel compelled to take the remainders to work. I doubt they'll go unfinished. Also, the recipe I used is low fat and contains only 1/4 cup butter. The guilt factor is pretty low.

Although I added a couple of ingredients the recipe is from Cooking Light's new book.

Traditional Banana Bread:
- 2 cups all-purpose flour
- 1/4 teaspoon baking soda
- 1/2 teaspoon salt
- 1 cup sugar
- 1/4 cup butter, softened
- 2 large eggs
- 3 cups of smashed ripe bananas
- 1/3 cup plain low-fat yogurt (I used vanilla)
- 1 teaspoon vanilla extract
- 1/2 cup chocolate chips
- 1/2 cup chopped pecans

1. Preheat over to 350

2. Lightly spoon flour into dry measuring cups; level with a knife. Combine flour, baking soda, and salt, stirring with a whisk.

3. Place sugar and butter in a large bowl, and beat with a mixer at medium speed until well blended (about 1 minute). Add eggs, 1 at a time, beating well after each addition. Add banana, yogurt, and vanilla, beat until blended. Add flour mixture, beat at low speed just until moist.

4. Add Chocolate chips and chopped pecans stirring until mixed.

5. Spoon batter into pan (Large, 8X4-inch loaf pans or mini-loaf pans) coated with cooking spray. Bake for thirty minutes if using mini loaf pan and 60 if using 8x4 dish.

After my success with this recipe I thought it would make the perfect addition to my valentine box. Plus, I knew bread would ship a lot easier then chocolates and my family would be grateful for an easy breakfast. I thus changed my valentine gift box to include chocolate-orange cookies, as well as Hidden Kiss cookies and mini bread loafs.

However, just as I thought my shopping list was finalized, I woke up with a new idea. How about sending out spiced mixed nuts, caramel flavored popcorn, and mini bread loafs? It seems a more likely candidate for mail delivery and also appeases to my families taste buds. I know that my dad will love the spiced nuts and my mom will enjoy the popcorn. I think the bread is a nice addition for both my brother and my grandmother who will love a breakfast that offers more excitement then cereal. Finally, I've got it- this is the perfect Valentines gift!!

I'll let you know what actually makes it into those cute & crafty boxes come V-Day!

Thursday, February 1, 2007

In a pinch, Crabcakes

One of my all time favorite foods is crab. I used to be a lobster girl but once I began paying attention to my diet I realized that lobster wasn't all that delicious without the butter. If you can get good crab it's best without toppings. Just crack em' open and eat them cold. I would happily eat crab every day if only I could afford to.

To suffice a crab craving on a smaller budget, I turn to crab cakes. One of my favorite restaurants in Rochester (where I grew up) is Tapas 177 Lounge. They serve the best crab cakes I've ever had. Rather then stuffing them full of bread crumbs, the crab is the star of the show and in each bite you get one or two huge pieces. Another thing I love about their crab cakes is the spice. It doesn't overwhelm the dish but it definitely gets your taste buds dancing and craving more.

I've made crab cakes three times and each new attempt is better then the last. With the above goals as my guide, I've adapted the amount of filling as well as what spices I throw in. While I still can't recreate the dish I did come close this time. A couple of ingredients that I believe are crucial in a delicious crab cake are: Lemon, worcestershire sauce, cajun spice, mayonnaise and scallions. NEVER leave out the scallions.

On Thursday I suggested crab cakes and a left over arugula salad for a quick dinner. Alex not only happily agreed but offered to make the cakes himself. Lucky me!! The recipe below is what we wound up with. They had the perfect amount of spice and a good consistency that stayed together during the flipping process. Like I said, this is one of those recipes you can play around with- just make sure you include the ingredients above. If you can afford fresh crab then by all means use that- otherwise the canned tastes just fine.

Crab Cakes:

- 2 large cans of crab (back and claw meat)
- 1/4 cup chopped scallions
- 1/2 cup crushed saltine crackers
- 1/2 cup mayonnaise
- 2 tbs. lemon juice
- 1 tbs. Worcestershire sauce
- 2 tsp. Cajun spice
- 1 tsp. paprika
- 1 tsp. garlic powder
- salt & pepper

Mix all the ingredients together. Add extra mayonnaise if it is too dry and extra saltines if it is not sticking together. Shape mixture into thick patties and fry in olive oil until both sides are browned.


Try not to eat them all, I dare you!!